How To Make Stained Glass
Full Supply List & Tips For Beginners
 In this post we're going to talk all about the supplies you need to start making stained glass. It can be overwhelming seeing all the different supplies that go into it, as well as actually learning each step of the process but I'm here to tell you that it’s a lot more simple than you might think. We'll go over the entire process along with the full list of all the supplies with links to everything.
Disclaimer: I make a small commission through some of these links at no extra cost to you. All the tools and supplies listed are ones I use and genuinely recommend. I appreciate the support if you decide to purchase through these links!
If you would like a video version of this post here's my video on YouTube.
Where To Start
The first thing I will recommend is seeing if there are classes or workshops in your area teaching stained glass. That is a great way to start, you’ll have everything you need, guidance, you’ll be able to get a feel for it and see if it’s something you want to continue. If you don’t have the option of taking a class in person, there are many guides and tutorials online. I put together a full class for beginners and it’s available on Skillshare which you can join here for free!

My very first piece (pictured on left) and a re-make (pictured on right).
I started out by watching a few tutorials and then just learned the rest by doing it. Once you know the basics you can definitely just learn and practice on your own. I will say that it takes time and there is a learning curve but it’s not impossible. I struggled a lot with soldering when I first started. It was my least favorite part and did not think I could be good at it but I'm so much better now. That would be my main advice to anyone starting, don’t be discouraged if you find that it’s not as easy as it may look. Trust me it gets easier with practice - I know that from experience. It’s all worth it when you start to see improvement.
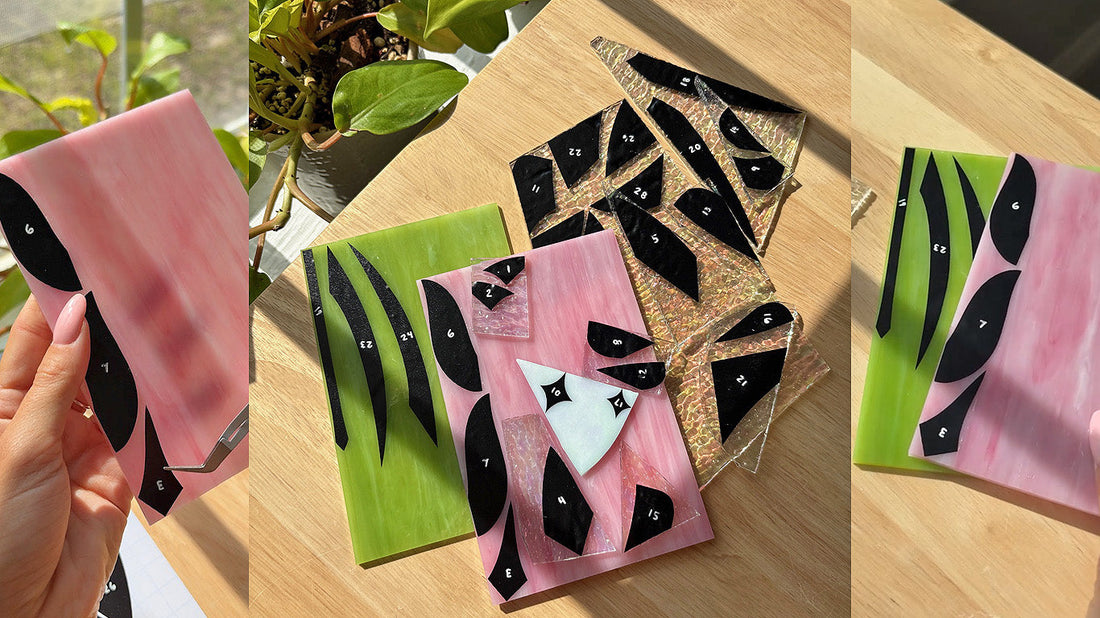
Creating Your Pattern

I use Procreate on my iPad to draw my patterns and a Cricut machine to cut them out. Here are the materials & tools I use for this step.
I've used sticker paper and removable vinyl for my pattern stickers. Here are the ones I use for mine!
- Waterproof sticker paper
- Removable vinyl black or white
- Pattern weeding tools
Glass

When it comes to buying glass I recommend local shops. If there aren't any in your area you can shop online at places like Anything in Stained Glass and Delphi Glass. Here are links to some cheaper glass packs to start out with. This glass is also super easy to cut!
Glass Cutting Tools

- Safety glasses
- Waffle grid mat cutting surface
- My glass cutter pencil grip
- Toyo glass cutter pencil grip
- Toyo pistol grip glass cutter
- Running pliers
- Grozing pliers 3/8 inch
- Narrow grozing pliers 1/4 inch
- Silberschnitt Running Pliers (great for cutting curves)
Glass Grinding

The glass grinder I use is a generic one from Amazon but has worked great for the past 2 years. I just recommend removing the bit when it's not in use to prevent it from getting stuck. There are different sized bits and should be replaced if they are no longer grinding away easily. I will say that I've been using the same one since I started though!
Copper Foiling

When it comes to copper foil there are many options. You can choose from different sizes and backing colors. I normally use 7/32 width foil but with thinner glass you may want to use 3/16 width foil and 1/4 inch foil for thicker glass. You want to match the foil backing to the finish of your solder. For example, if I'm using copper patina I will use copper backed foil. If I'm leaving the solder silver I will use silver backed. This only matters when using transparent/clear glass otherwise I like to use copper backed since it tends to be cheaper.
- Copper foil 7/32 This is the foil I recommend starting out with!
- Edco 3/16 copper foil
- Edco 7/32 copper foil
- Edco 7/32 silver backed foil
- Edco 7/32 black backed foil
- Burnishing tool
- Fiskars detail knife (for trimming foil)
Soldering

I recommend a temperature controlled soldering iron for stained glass work. This helps with getting even solder lines and will make soldering easier in general. Use tip tinner to protect the iron tip from oxidation - it also helps to pick up/hold onto solder. There are three different types of flux - liquid, gel and paste. I prefer gel flux as it stays in place, doesn't dry fast, and cleans off easy. Make sure to solder in a well ventilated space and wear a respirator with the correct filters! You want to avoid inhaling the fumes created by the flux.
- Soldering mat
- Hakko FX-601 soldering iron
- Iron tip replacement
- Tip tinner
- Soldering iron holder
- Canfield 60/40 solder
- Canfield lead free solder
- Classic 100 gel flux
- Flux brushes
- Respirator mask
- Respirator cartridges
- Smoke absorber
Patina & Cleaning

Before and after polishing with carnauba wax (left to right).
When it comes to cleaning the piece, I first rinse with water and baking soda to break down the flux. Then I scrub with dawn soap and a melamine sponge. Make sure to really clean the piece so there is no remaining flux. If I'm not applying patina I will go ahead and polish the piece using carnauba wax. The one I linked below gives the solder a great shine!
- Novacan copper patina
- Novacan black patina
- Kwik clean flux cleaner
- CJ's flux remover
- Clarity finishing compound
- Carnauba wax
- Melamine sponge
- Lead remover wipes
- D-lead hand soap
Hanging material

The hanging material is up to personal preference. Lately I've just been using some waxed cord to hang my pieces!
- Pre-tinned copper wire (I use this to make my jump rings/wire attachments)
- Wire wrapping pliers
- Jewelry making pliers
- Silver curb chain
- Wax cord
Tutorials
I've made some tutorials on YouTube so I will leave them here!
How I make my patterns:
How to cut glass:
How to grind glass:
1 comment
Thank you for making this information so accessible!!!!